She’s a world renown freelance developer all the way from Lebanon.
She won an O’Reilly Web Platform award among written books
@sarasoueidan
sarasoueidan.com
Front-end developer specializing in html semantics, modern web design, modern CSS, accessibility, etc.
She also does workshops. A few weeks before doing a workshop in-house she asks the developers in the company what pain points they have so that if she doesn’t already have it in the workshop she can add it.
2 years ago she ran a workshop for Netflix engineers. An engineer said he was interested in learning about SVG filters, and while he know there was a lot possible with them on the web but was unsure how to use them. Plus the syntax for them is a bit intimidating. The research for that workshop was the foundation of this talk.
Over the last few years, the gap between what’s possible to do in graphics editors and what’s possible on the web has been getting smaller.
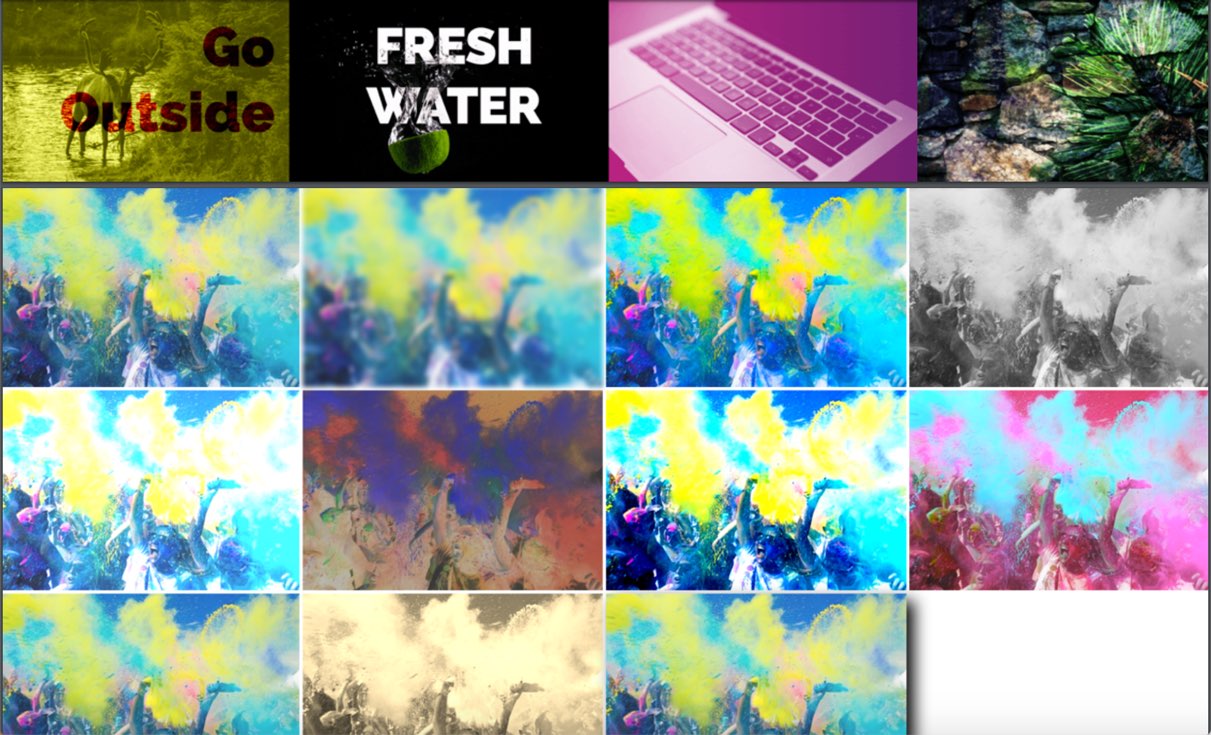
This is thanks to additions to CSS like CSS Shapes where you can wrap content inside and around non-rectangular shapes, and things like CSS blend modes. Then there’s CSS filters that allow us to do image editing right in the browser.
There are 11 filter functions in CSS that allow different effects. The url() function allows us to import more complex filter effects from SVG to use in CSS. In fact, CSS filters are imported from SVG! They’re basically just shortcuts to a subset of filter primates in SVG. The SVG versions are capable of far more than their CSS counterparts.
SVG that has been around 2 decades now has always had the ability to apply photoshop level effects to photos in the browser!!
It is possible to blur anything currently with the CSS filter:blur(); function. This is a primitive shortcut to the SVG primitive which actually allows you to apply a one-directional blur like horizontal only.
SVG filter primitives are not limited to image color manipulation.
They are capable of much more than that.
BUT WHY USE SVG FILTERS ON THE WEB?
We cannot talk about one image anymore – we need to be creating multiple versions of the image and serve them to the appropriate users.
Doing effects in the browser means:
1. the effects are resolution independent
2. easier and faster to tweak and change (you don’t have to go back to image editor, export, remmed)
3. the content is editable and dynamic
4. the content semantics are preserved
5. the effects are animatable!
SVG is both a document format and an image format. This means just like like html you can apply CSS and JS animations to the content of SVG just like you can to the content of html! This is not possible with static images.
These effects are created using the conveniently named filter element.
Filter elements are something that can only be referenced using the filter element. Usually elements that are not rendered directly are rendered via the ‘defs’ elements. But SVG elements don’t need to be wrapped in ‘defs’ elements because an SVG filter will not appear until it’s called by a filter element.
In SVG each filter element contains a group of fe offsets. The input of a filter primitive can be the original source graphic (image) or a piece of text, the alpha-channel of that source graphic, or the result of another primitive/function.
Since you can use the result of one operation to be the input of another operation, it means there is an endless effect of filter effects you can create via combinations on the web using SVG TODAY!!!
feOffset takes in the SourceAlpha.
feComposite takes in two inputs and usually you use one to effect the other.
EX: CREATING A DROP SHADOW
It’s simple but has multiple steps and requires multiple filter effects.
We’ll start by creating our filter container, and applying this filter to the image we have, and then recreate the filter shadow step by step.
feOffset is used to offset the input. SourceAlpha is the alpha channel of the image.
Then we use the output of this feOsset to be the input for feGaussianBlur
If you don’t set the input of the feGaussianBlur primitive it automatically uses the output of the primitive before it.
feColorMatrix can be used to change the opacity of one or more channel.
To put the image on top of the shadow she’s just created, she’ll use feMerge. Each layer is specified in it’s each feMergeNode element.
feMorphology operates on the form of an objects and does either erosion or dilation. Morphology expands or shrinks pixels into neighboring pixels.
When you morph an image, the picture dimensions get larger or smaller. Different colors also result from the effect. Erode produces a lighter output. Dilate produces a lighter output.
Morph can be used for text to create external outline with a more desirable result than traditional method of stroke which uses the area of the text and takes some of it away to create the outline. Using dilate adds the outline outside of the text and does not make the text thinner.
Composting is the combining of a graphic element with its background. This defines how what you want to draw will be blended with what is already drawn on the canvas. The source is what you want to draw and the destination is what’s already on the canvas.
You can also create ‘knockout’ text where you take out the middle of the text and see what’s behind it. Use feMorphology to create an outline of the text by taking the original source text itself and dilating it. The change the color of the ‘outline’ you just change the color of the text itself! The second step is to composite the original text on top of the dilated text to ‘cut out’ that area.
APPLYING TEXTURE
How can we use an image of texture and use it to change the texture of another image or text?
Displacement map is an image whose color information is used to distort the content of another element.
In Photoshop you desaturate the image, reduce the amount of detail in it by blurring it by 1px (if you have too much detail and apply it to text it won’t be realistic), save it as a displacement map, reuse the original image as a background behind the text, create text, apply a distorting filter using the image as a displacement map, and then refine the effect by adding a slight transparency to the text and blending it with the background image.
So how do we do that in SVG?
1. Fill the filter region are with the image that will be used as a texture (feImage). You are literally getting an image and then putting it inside the filter area.
2. Desaturate the image using feColorMatrix value=“saturate” to apply a black and white effect
3. You apply a 1px Guassian blur to the image using feGaussian Blur
4. Use the image to distort the text with feDisplacementMap
5. Blend the text into the background using feBlend and and apply a translucent effect decreasing opacity using feCompositeTransfer
6. Display the text and the image behind it using feMerge
IMAGE COLOR MANIPULATION EFFECTS
feComponentTransfer provides a variety of component transfer functions that do different things.
Gamma allows you to control contrast and intensity
Discrete allows you to create poster effects by decreasing the amount of colors
To create a gradient map you can use feComponentTransfer, but in order to get a range of colors you need to use another feComponentTransfer function called table, and then to improve the contrast we can use feComponentTransfer gamma.
CREATING TEXTURE
SVG can generate rich texture using noise
feTurbulence primitive generates and renders Perlin noise. It’s useful in simulating natural phenomena like clouds, fire and smoke and generating complex texture like marble or granite.
This fills a rectangular content with new, random noise.
BaseFrequency determines the complexity of the pattern. Low frequency = big patterns, high frequency = small patterns.
Turbulence is the default noise and is more grainy, fractalNoise is more cloudy and smooth.
The higher the number of Octaves the more detail you can see in the noise.
testdrive-archive.azurewebsites.net/graphics/hands-on-css3/hands-on…. missed the link
Turbulence can also be animated.
HOW TO USE GENERATED NOISE FROM FETURBULENCE PLUS LIGHTING VIA FEFLOOD TO CREATE TEXTURES
Shining a light on a graphic provides additional depth and texture.
Types of Light:
feDiffuseLighting indicates indirect light from an outside source like sunlight
feSpecularLighting specifies secondary light that bounced from reflective surfaces.
It uses an object or image by using the alpha channel of that image as a bump map.
Light Sources:
feDistantLight – ex: sunlight
fePointLight – ex: room lighting
feSpotLight – ex: same as PointLight but can be narrowed down and pointed
All you need to create a simple texture using SVG: Texture, Random Noise, and Lighting Effects
The SVG Filter Region
The set of filter operations you’re using need a filer region to be applied to. Each element inside of an SVG whose boundaries are defined by the border of a bounding box. This is similar to the idea of a CSS box that encases an element. However in SVG not all elements are rectangular, so the bounding box is the smallest fitting rectangle around an element.
If you apply any filter effect you apply to an element it will apply to the bounding box. However many filters will need to affect pixels outside the bounding box.
It is often necessary to provide padding space in the filter region because the filter effect might impact bits slightly outside the bounding box on any given object. It is also possible to provide negative percentage value for ‘x’ and ‘y’ and percentage values greater than 100% for ‘width’ and ‘height’.
If she needs to see her filter region she usually floods it with a certain color and then uses feMerge and puts the original object on top.
Keep in mind you can also change filterUnits.
@sarasoueidan


0 Comments