by Derek Featherstone
Speaker Intro: Derek Featherstone is the Chief Experience Officer at Level Access, where he focuses on ensuring that accessibility and inclusion are an integral part of creating outstanding customer experiences. He’s been working on the web since 1999 when he left his career as a high school teacher to start his own web design company, and also compete in a few Ironman triathlons. Today, Derek is here to explore ways of making sure products and designs are accessible right from the start of the project, instead of trying to wedge it in at the last minute.
In April of 21, Unilever announced a new product to GRI inclusive, a deodorant that was designed for people with disabilities as part of the process. Through interviews and consultations and iterating through multiple prototypes, all of which included people with disabilities, they ended up creating this brilliant and useful design. You may notice some interesting things about the deodorant itself.
The container uses a hook at the top, there’s a grip at the bottom that allows for people with limb differences to be able to effectively apply the deodorant. There’s a larger than typical applicator ball. And as shown here, there are six magnets that help close the lid.
I took a look at that and decided to take a crack at it on my own. But instead of starting from the very beginning, I decided to start with some pre-existing deodorants. Here you can see some of my additions to these existing deodorants to add those accessibility features. The hook on the container and the large application surface. Come back to this a bit later. But there’s a clear difference between accessibility being built in versus bolted on. This entire talk is centered around one goal. I think accessibility right from the start by building it into the process, rather than trying to both accessibility on at the end.
I’ve been working with teams for over 20 years on getting accessibility right. There have been a lot of things that I’ve learned along the way.
When we get it right from the start, we not only aim to create that seamless experience, we also have a greater chance of meeting the basic accessibility needs of people with disabilities. Accessibility is bolted on or added later. It doesn’t feel like it’s part of the product. Instead, it feels like an afterthought. And quite often you’ll miss meeting even basic levels of accessibility compliance.
Let’s pretend you have won a project mainly because of your experience with accessibility in the past. Your team creates this guide with the steps that you need to follow to ensure your app is accessible from the very start. Maybe even before you got started. Here’s your team’s idealized process.
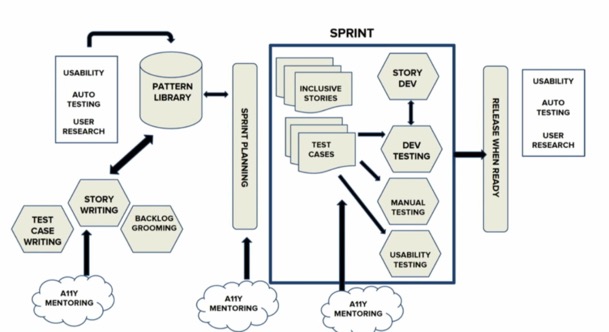
Now it likely isn’t perfect. But you can see here that there are all the things you’d expect in an agile process, sprints of work that use inclusive stories and accessibility-specific mentoring and coaching for the team during the sprints. There’s also mentoring during sprint planning, and working with the product team to write stories to groom the backlog. To get ready to do the work in a similar level of effort went into making sure that the components in the design system are accepted. To allows for a lot of leverage down the road.
Like I said, this is an ideal accessibility coaching and testing is integrated into the process. Sometimes this just isn’t reality. The process often ends up something more like this, where we go in a straight line and go as fast as we can and don’t come up for air until you’re done.
That’s where we face that moment of panic when someone pipes up near the end and says, has anyone checked this in a screen reader yet? The team scrambles, and it doesn’t go well. These are the steps that your team came up with their tried-and-true methods that help them avoid previous missteps, and do more of the things that have worked well in the past. It doesn’t matter exactly how you do these steps, but it does matter that you put time into each one of them. Keep in mind that this isn’t your entire process. This is just how you incorporate accessibility along the way. Do this well.
You should do research with people with disabilities using surveys, prototypes, usability studies, and other research methods to create content and functionality that prioritizes people with disabilities can understand and incorporate accessibility requirements into the entire process.
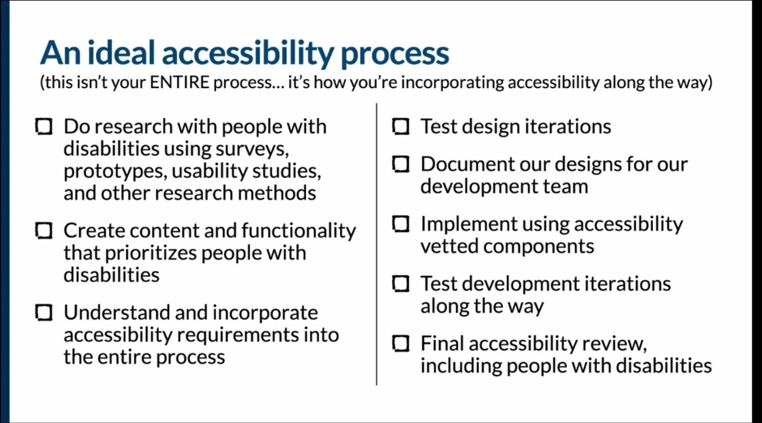
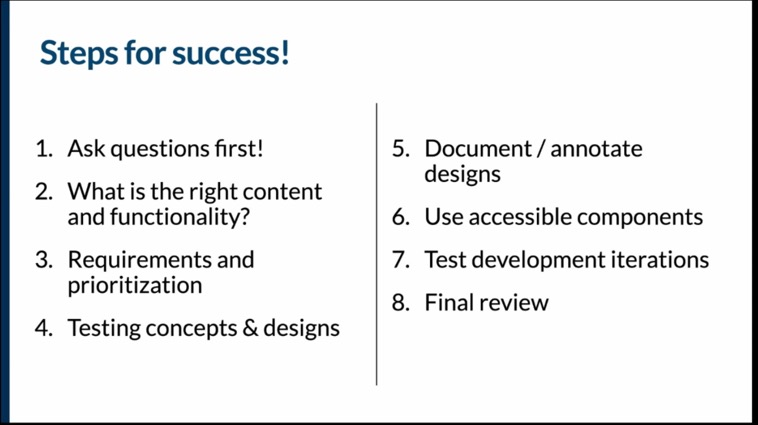
Test your design iterations, document your designs for the development team. Implement the design using accessibility vetted components, test your development iterations along the way, then do a final accessibility review, including people with disabilities as part of that process. So if we boil that down into what steps for success you should use, we asked questions First, we figure out the right content and functionality. Go through our requirements and prioritization process. test our concepts and our designs. We document those designs, we use accessible components, we test our development iterations, and we do a final review. So first, we need to ask questions.
Step 1: Set our designs
We document those designs, we use accessible components, we test our development iterations, and we do a final review. First, we need to ask questions. First. We want to make things accessible and inclusive. We just need to ask more questions isn’t always easy to work this in, particularly if the app has already been envisioned a certain way to solve a certain problem. If you can, you should find a way to do this early before you head down the path of creating a solution.
You should find out more about the barriers that people with disabilities face. The young shares her thoughts on the importance of digging into the problem space and understanding its relationship to the solution space. I love this way of thinking. We’re in the solution space when we’re already headed down a path and creating a solution. And then we’re engaging with people with disabilities in that space.
We are trying to figure out if our solution is right. But when we’re in the problem space, we’re trying to find out what’s the right problem to solve a lot of different ways of engaging people with disabilities before you’ve actually started working on the solution.
It could be as simple as asking something like: “I’m working on _______. Tell us about your experiences using things in this product category and how it does or doesn’t work for you.” Once you hear the answers to that, you can start to turn that into figuring out the right content and functionality.
Through that interview process with disabilities have told you what their priorities are. They have told you the barriers that they have faced and the things that might make those barriers be eliminated. told you what matters to them, either with competitors’ products or your own products. Maybe even told you which barriers will send them packing and which ones they will put the effort into working through. Here’s what I mean by prioritizing content and functionality for people with disabilities.
Once we’ve decided what content and what functionality is going to be important to people with disabilities for our app, we need to start getting that ready. We need to create visual and interaction designs for the app. We need to create the copy and the interface labeling and instructions and error messages and calls to action. And we need to focus on infrastructure and ultimately coding the interface.
Now there’s a specific way to think about requirements that will help you lead to more success with accessibility. Back to our Degree inclusive deodorant, you may have noticed that there’s a hook on top that allows a person to hang it up as part of opening and closing. If you remember, there’s a larger than typical applicator ball as shown here. And six magnets that help close the lid… etc.
It’s the features and the function. order to represent accessibility well in your process, you should incorporate it into three main areas. Now this assumes that you’re using agile but you don’t have to be want to include it in your definition of done. That way. It’s well defined beforehand. And everyone agrees that this is what needs to happen for something to be released to the world.
Some examples might be things like there are no automated test errors. There are no P1 or P2 issues. We scored 3.5 or higher for all key task flows. We’re not asking for perfection. But we do want things to work reasonably well. Second place to include accessibility requirements is to include them heavily in your design system. Finally, you’re going to want to ensure you’re including accessibility at the execution level, you want to integrate accessibility into your stories or annotations.
Building accessibility into stories is useful because it allows you to add those one-off notes that your design system components may not take into account. This might be things like updating the color swatch, the system announces the new color, and focus moves to the next available color for the product. Or it might be when the modal date filter is closed, focus returns to the latest date in the month that is selected.
Is accessibility part of your MVP? Did you include accessibility in your stories or other non-functional requirements? Did you included accessibility as part of your definition of done? Have you built accessibility into the ceremonies and processes that your teams are using? If you can answer these questions with a yes, then you’re well on your way to ensuring accessibility throughout the process.
And perhaps the single most important thing you can do as a product owner or manager is this need to ensure that accessibility is a part of every feature, rather than a feature of its own.
When it’s a feature of its own, it becomes just way too easy to leave it in the backlog for phase never (lol). Once you’ve got all of that done, we turn to the work of designing and building.
Getting early feedback on your designs is always useful. The longer you go without getting feedback, the harder it is to change. I saw Jeff Veen speak early in my career. He shared this graphic at a conference.
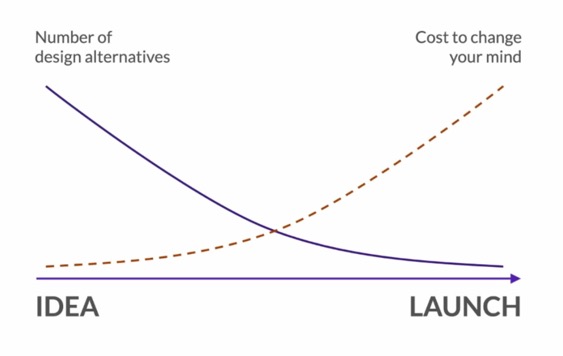
At the beginning of the process where you’re working with ideas, you have all kinds of design alternatives, and it costs you almost nothing to change your mind and go in another direction. But as you approach launch, number of design alternatives goes down and the cost to change your mind goes way up. The sooner you get feedback with respect to accessibility, the less it will cost you to change your mind if you weren’t doing it right.
So how should we test the design? Most people think of color contrast when we’re talking about testing designs, what I like to push it further to check that we aren’t using color alone to convey meaning. As an example, I always think of when you’re editing a document online collaboratively, and more than one person has the same initials. How do you know which person is which box uses colors and icons associated with names and accounts? Microsoft Word 365 uses different colored circles with initials in them. So if you have the same initials, the only way you can tell the difference between two people is the color of their circle. And in that case, they are using color alone to convey meaning.
I also want to make sure that you test your icons in visual language and do that early. Get your icons in front of a diverse group of people, especially including people with low vision. You want to check to see if your icons work when they’re magnified and or blurry. Are they recognizable, are they distinguishable from one another?
Also, as a note, the combination of italicized and red text is actually notoriously harder to read in long passages for people with low vision.
Finally, you should test your notifications.
All of these things can be tested at a prototype stage can also be tested in a live product. You could test these things much earlier in a mock-up stage, if that’s where you are. Again, the earlier the better.
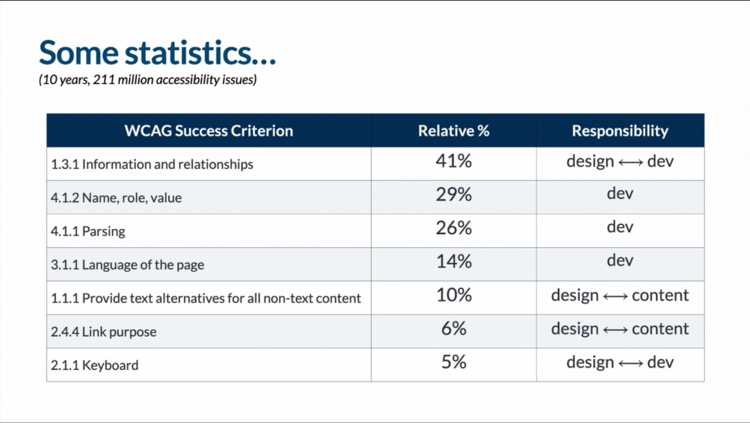
I work at a company called level access. We’re an accessibility software and services company. And we’ve been in business for more than 24 years. Most of our time and effort is spent working with teams helping them improve their accessibility process. And one of the ways that we do that is we help them by testing their software, websites and applications. of statistics going back well over 20 years of logging both automated and manual accessibility issues, pulled the data for the last 10 years and found that in that time, we had identified 211 million accessibility issues. Number one accessibility issue that we found in terms of frequency 1.3 dot one information in relationships shows up 41% of the time. Means that out of those 211 million accessibility issues that we have logged over 80 million of them are all to do with 1.3 dot one information and relationships.
So with those statistics about where we have typically failed as an industry, I want you to think about those things as we’re looking at these next steps that we should take an ideal accessibility process.
(blogger’s note: I didn’t catch the titles of steps 2-4… but I believe I caught notes on them above)
Step 5: Document and annotate our designs really well.
I would suggest that you put about 30% of your tactical accessibility effort into ensuring clarity between designers and developers.
(Missed lots of descriptions here of specific slides)
Here’s what I think are the must haves for a documentation and annotation effort to be successful.
- You must document or annotate the linear order of a design
- You must make note of any specific notable focus path changes.
- Make note of the labels or accessible names, or any keystrokes that are required to operate something, you should make note of that in your documentation.
- You should also note the type of controller component that is being used.
- And then note headings and any other semantics that are of note to that particular design.
Step 6: You should use accessible components. I would estimate that you need to put about 40% of your tactical accessibility effort into your design system if you’re using one in mind, and that little asterisk at the end there is to remind us that putting accessibility effort into a design system is also a strategic thing.
Step 7: Test your development iterations. This is traditionally what people are talking about. When they talk about shifting accessibility left. Instead of testing at the end, let’s test during development, I would estimate that you should put about 30% of your tactical accessibility effort into testing throughout your process.
Should we test our dev work? some critical questions that you need to ask is our code reflect the visual relationships, hierarchy position, and proximity that are present in the design?
Is our code clean, semantic markup? And does all functionality work efficiently with a keyboard?
There are a lot of tools out there that will help you test your work. And people ask me all the time, which tools they should use. You should conduct accessibility testing with the least complex tool available that requires the least learning and provides the most value.
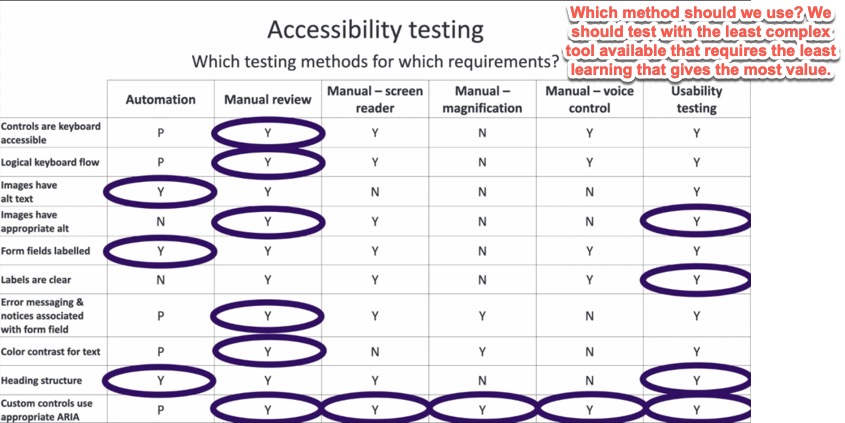
Now I’ll tell you a little bit more what I mean by that. If you look at this accessibility testing matrix, you’ll see down the left hand side we have a whole bunch of different requirements.
- Controls are keyboard accessible.
- There’s a logical keyboard flow.
- Images have alt text.
- Images have appropriate alt.
- The form fields are labeled.
- And the labels are clear.
- Error messaging and notices are associated with form fields.
- You have the right color contrast for text.
- You have a good heading structure.
- You have custom controls that use appropriate ARIA.
Across the top, we have six different mechanisms for testing:
- Tests using automation
- Manual review.
- Manually with a screen reader
- Manually with a magnifier
- Manually with voice control or voice recognition, and
- Usability testing.
All of these are candidates for testing each one of those requirements.
It doesn’t make sense to test with a more complex tool when a less complex tool would do. Could you test each one of these requirements with each one of these methods? Possibly.
Which one should we use?
We should test with the least complex tool available, that requires the least learning, that gives us the most value.
Step 8: Your final review.
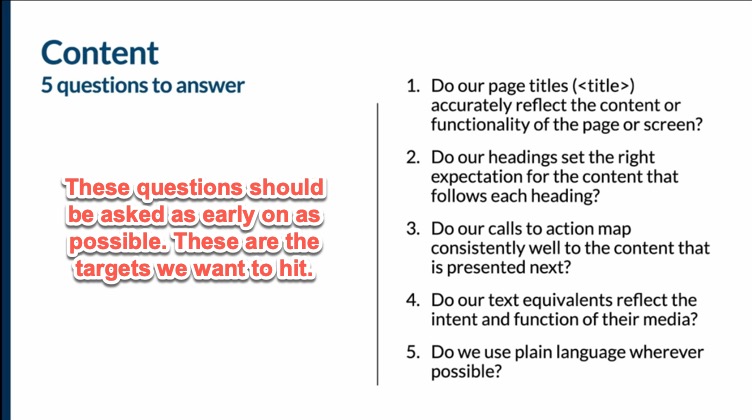
When we’re doing that final review, you need to keep in mind that this is not the first time that we have tested these things. In other words, these questions are things that you should be answering as early in the process as you can summarize them here because these are kind of the targets that we want to hit.
So for content, do our page titles accurately reflect the content or functionality of the page or screen? heading set the right expectation for the content that follows each candidate. A call to action map consistently Well, the content that is presented next. Our text equivalents reflect the intent and function of their media. When do we use plain language wherever possible?
On the dev side, three critical questions that we’ve already seen is our code reflect the visual relationships, hierarchy, position and proximity that are present in the design? Is our code clean semantic markup? And does all the functionality work efficiently with a keyboard? design perspective, we need to answer these three questions. Which things should be focused? and in what order for keyboard efficiency? What is the name of each thing? And is there a visible feedback mechanism for an interaction?
All of these questions, go back to your annotated design, and to the things that you are thinking about when you are testing a design presented this as an ideal accessibility process. But teams often come to me and say, well, that ship has already sailed. We’ve already started, we can’t do that. like to present you with this MVP accessibility process. If you can’t do research, you can’t do surveys. You can’t do usability studies, either exploratory or summative.
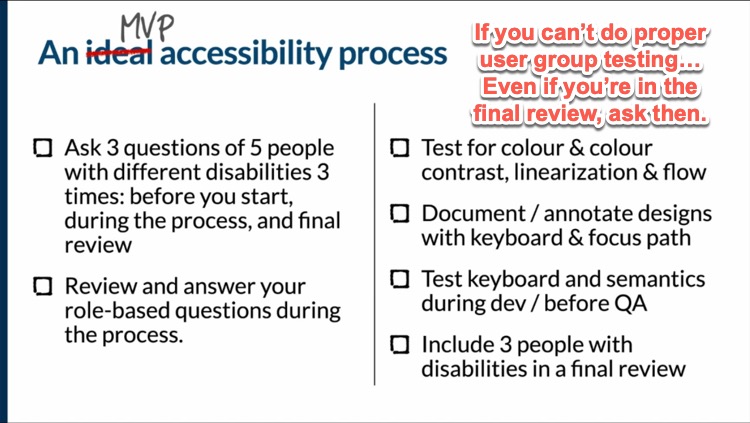
If you can’t do all of these things, then you should think of it this way as three questions of five people with different disabilities at three times during the process before you start during the process. And in final review already started and you can’t go back in time and ask questions before you start, then go for it during the process and during final review. If it’s too late, the process is almost over and you’re in that final review, then ask those questions in final review. And remember to ask earlier next time, review and answer your role-based questions during the process.
At a minimum, you have to test for color and color contrast linearization and flow have to document and annotate those designs in some way, shape or form with both the keyboard And key focus Pappy patients. You have to test with keyboard and for semantics during development and before QA. And if you can, let’s include at least three people with disabilities in a final review. So I want to summarize all of this up.
These are the eight steps that I see as absolutely essential to accessibility success. We need to build this into our process. If we build it in from the beginning, we are doing a much better job of fulfilling our promise of creating an accessible web app, or iOS or Android app, or a website.
Whatever it is, if we are building and taking action, on accessibility from the beginning, we are in a much better position to succeed. get better at doing accessibility all the way along, the more efficient you will be when you become more efficient, but won’t be able to blame accessibility for making the process take longer and cost more. The only reason that those things happen now is because it’s not already baked into the process. It costs more money and it takes longer when you try to bolt it on.
Build it in. Don’t bolt it on.


0 Comments